AngularJS Directives and Expressions:
AngularJS Directives
- AngularJS facilitates you to extend HTML with new attributes. These attributes are called directives. There is a set of built-in directive in AngularJS which offers functionality to your applications. you can create custom directives for your application.
- Directives are markers on a DOM element that tell AngularJS to attach a specified behavior to that DOM element or even transform the DOM element and its children.
- Most of the directives in AngularJS are starting with ng- where ng stands for Angular.
| Directive | Description |
|---|---|
| ng-app | Auto bootstrap AngularJS application. |
| ng-init | Initializes AngularJS variables |
| ng-model | Binds HTML control's value to a property on the $scope object. |
| ng-controller | Attaches the controller of MVC to the view. |
| ng-bind | Replaces the value of HTML control with the value of specified AngularJS expression. |
| ng-repeat | Repeats HTML template once per each item in the specified collection. |
| ng-show | Display HTML element based on the value of the specified expression. |
| ng-readonly | Makes HTML element read-only based on the value of the specified expression. |
| ng-disabled | Sets the disable attribute on the HTML element if specified expression evaluates to true. |
| ng-if | Removes or recreates HTML element based on an expression. |
| ng-click | Specifies custom behavior when an element is clicked. |
2.1 Understanding ng attributes
1. ng-app
- ng-app directive is a starting point of AngularJS Application.
- It initializes the AngularJS framework automatically. AngularJS framework will first check for ng-app directive in a HTML document after the entire document is loaded.
- Typically ng-app directives should be placed at the root of an HTML document e.g.<html>or<body>tag, so that it can control the entire DOM hierarchy.
- However, you can place it in any DOM element.
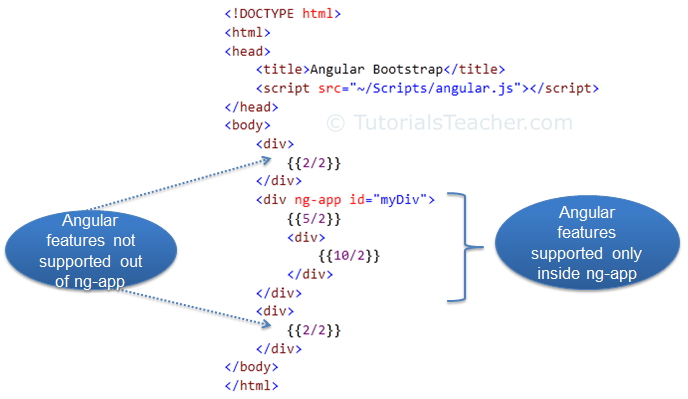
In the above example, ng-app directive is placed in the div element whose id is "myDiv". Therefore, AngularJS will only compile myDiv and its child elements. It will not compile the parent or sibling elements of myDiv.
2. ng-init
- The ng-init Directive is used to initialize AngularJS Application data.
- The ng-init directive defines initial values and variables for an AngularJS application.
Syntax:
<element ng-init = "expression"></element>
Example:
<html>
<head>
<script src="./angular.min.js"></script>
</head>
<body>
<div ng-app="" ng-init="objects="{company:xyz',course:'AngularJS'}">
<p>
Learn {{objects. Course}}
From {{objects. Company}}
</p>
</div>
</body>
</html>
3. ng-model
- The ng-Model directive is a directive that is used to bind the values of the HTML controls (input, select, and textarea) or any custom form controls, and stores the required user value in a variable and we can use that variable whenever we require that value.
- It also is used during form validations.
- The various form input types (text, checkbox, radio, number, email, URL, date, datetime-local time, month, week) can be used with the ng-Model directive.
Syntax:
<element ng-model=""> </element>Example
<html>
<head> </head>
<body>
<div ng-app="">
<p>Enter your Name: <input ng-model="name" type="text" /></p>
<p>Hello <span ng-bind="name"></span>!</p>
</div>
<script src="angular.min.js"> </script>
</body>
</html>
4. ng-controller
- The ng-controller Directive in AngularJS is used to add a controller to the application.
- It can be used to add methods, functions, and variables that can be called on some event like click, etc to perform certain actions.
Syntax:
<element ng-controller="expression"> Contents... %lt;/element >Parameter value:
expression:It refers to the name of the controller.Example
<html>
<head>
<script src="angular.min.js"></script> </head>
<body ng-app="app">
<h2>ng-controller Directive</h2> <
<div ng-controller="demo">
Name:<input class="form-control" ng-model="name" type="text" >
You entered: <b> <span>{{name}}</span> </b>
</div>
<script>
var app = angular.module('app', []);
app.controller('demo', function($scope) { $scope.name = "Controller start!!"; });
</script>
</body>
</html>
5. ng-bind
- The AngularJS ng-bind directive replaces the content of an HTML element(HTML controls) with the value of a given variable, or expression.
- If you change the value of the given variable or expression, AngularJS changes the content of the specified HTML element as well as.
Syntax:
<element ng-bind="expression"></element >Example
<html>
<head> </head>
<body>
<div ng-app="">
<p>Enter your Name: <input ng-model="name" type="text" /></p>
<p>Hello <span ng-bind="name"></span>!</p>
</div>
<script src="angular.min.js"> </script>
</body>
</html>
6. ng-repeat
- AngularJS ng-repeat directive is a handy tool to repeat a set of HTML code for a number of times or once per item in a collection of items.
- ng-repeat is mostly used on arrays and objects.
- ng-repeat is similar to a loop that we have in C, C++ or other languages but technically it instantiates a template(normally a set of HTML structures) for each element in a collection that we are accessing.
Syntax :
<div ng-repeat="keyName in MyObjectName "> {{keyName}}</div>Here "MyObjectName" is a collection that can be an object or an array and you can access each value inside it using a "keyName".
Example:
First we create a app.js separate Javascript file
app.js
var app = angular.module('myApp',[]);
app.controller('MainCtrl', function($scope){
$scope.names = ['Adam','Steve','George','James','Armin'];
console.log($scope.names);
});
Explaination: Line 1-Created an app module named "myApp" with no dependencies.
Line 2-Main controller for our application.
Line 3-Array of strings “names”.
After we create index.html file and import app.js file in index.html using script tag
index.html
<html ng-app="myApp">
<head>
<script src="angular.js" type="text/javascript"></script>
<script src="app.js" type="text/javascript"></script>
</head>
<body ng-controller="MainCtrl">
<h2>Here is the name list</h2>
<ul>
<li ng-repeat="name in names">{{name}}</li>
</ul>
</body>
</html>
Line 5-Include all the dependencies like angular-js and app.js fileLine 12-Use ng-repeat directive to get one name from names array at a time and display it.
7. ng-show
- The ng-show Directive in AngluarJS is used to show or hide the specified HTML element.
- If the given expression in the ng-show attribute is true then the HTML element will display otherwise it hides the HTML element.
- It is supported by all HTML elements.
Syntax:
<element ng-show="expression"> Contents... </element>Parameter Value:
expression:
It specifies the element will be displayed only if the required expression returns true.Example 1:
This example uses the ng-show Directive to display the HTML element after checking the checkbox.
<html>
<head>
<script src="angular.min.js"> </script></head>
<body>
<div ng-app="app" ng-controller="ctrl">
<h2>ng-show Directive</h2>
<input id="chshow" ng-model="show" type="checkbox" />
<label for="chshow"> Show Paragraph </label>
<p ng-show="show">
Show this paragraph using ng-show </p>
</div>
<script>
var myapp = angular.module("app", []);
myapp.controller("ctrl", function($scope) {
$scope.show = false;
});
</script>
</body>
</html>
8. ng-readonly
- The ng-readonly Directive in AngularJS is used to specify the readonly attribute of an HTML element.
- The HTML element will be readonly only if the expression inside the ng-readonly directive returns true.
- The ng-readonly directive is required to change the value between true and false.
- In case, if the readonly attribute is set to false, then the presence of the readonly attribute makes the element readonly, irrespective of its value.
Syntax:
<element ng-readonly="expression"> Contents... </element>Parameter:
expression:It returns true if the expression sets the element's readonly attribute. This directive is supported by <input>, <textarea>elements.Example:
This example uses ng-readonly Directive to enable readonly property.
<html>
<head>
<script src="angular.min.js"> </script> </head>
<body ng-app style="text-align:center">
<h2>ng-readonly Directive</h2>
<div>
<label>Check to make month readonly: <input type="checkbox" ng-model="open">
</label><br><br>
Input Month:<input ng-readonly="open" type="month" ng-model="month">
</div>
</body>
</html>
9. ng-disabled
- The ng-disabled Directive in AngularJS is used to enable or disable the HTML elements.
- If the expression inside the ng-disabled attribute returns true then the form field will be disabled or vice versa.
Syntax:
<element ng-disabled="expression">Contents... </element>Example:
This example uses the ng-disabled Directive to disable the button.index.html
<html ng-app="myApp">
<head> <script src="https://ajax.googleapis.com/ajax/libs/angularjs/1.8.2/angular.min.js"></script>
<script src=“app.js”></script>
</head>
<body ng-controller="myController">
<form>
Username:<input type="text" id="username" ng-model="user.username" required>
Password:<input type="password" id="password" ng-model="user.password" required>
<button ng-disabled="!user.username || !user.password">Submit</button>
</form>
</body>
</html>
App.js
var app = angular.module('myApp', []);
app.controller('myController', function($scope) {
$scope.user = {
username: '',
password: ''
};
});
10. ng-if
- The ng-if Directive in AngularJS is used to remove or recreate a portion of HTML element based on an expression.
- If the expression inside it is false then the element is completely removed from the DOM.
- if the expression is true then the element will be added to the DOM.
Syntax:
<element ng-if="expression"></element>Example:
In following Example, When there is any text in input element then div content will be shown otherwise it will be hidden.
<html>
<script src="angular.min.js"></script>
<body ng-app="">
Enter Text:<input type="text" ng-model="textcheck">
<div ng-if="textcheck">
<h1 style="color:green">GeeksforGeeks</h1>
</div>
</body>
</html>
11. ng-click
The ng-click Directive in AngluarJS is used to apply custom behavior when an element is clicked. It can be used to show/hide some element or it can pop up an alert when the button is clicked.Syntax:
<element ng-click="expression"> Contents...</element>Parameter Value:
expression:It specifies when the particular element is clicked then the specific expression will be evaluated.
Supported tag:It is supported by all the elements in HTML.
Example:
This example illustrates the implementation of the ng-click Directive to display an alert message after clicking the element.
<html>
<head>
<script src="angular.min.js"></script>
</head>
<body ng-app="geek" style="text-align:center">
<h2>ng-click Directive</h2>
<div ng-controller="app">
<button> <a href=""ng-click="alert()"> Click Here </a> </button>
</div>
<script>
var app = angular.module("geek", []);
app.controller('app', ['$scope', function($app) {
$app.alert = function() {
alert("This is an example of ng-click");
}
}]);
</script>
</body>
</html>
2.2 Expression and Data Binding
Expression:
- In AngularJS application data & HTML can be bind with help of expression
- Expression written inside double braces such as {{expression}}
- It similar as javascript expression.
- They contain literals, operators & variables.
- It is made to work with primitive types such as string and numbers.
Example
<html><head> <script src="angular.min.js"></script> </head>
<body>
<h1>Expression Demo:</h1>
<div ng-app>
10+10={{10+10}} <br>
10-10={{10-10}} <br>
10*10={{10*10}} <br>
10/10={{10/10}} <br>
</div>
</body>
</html>
1. Expression when using number:
Syntax:
<element> {{your expression}}</element>
Example:
<html><head><script src="angular.min.js"> </script></head>
<body>
<h1>Calculate Simple interest</h1>
<div >
Enter Value for P<input type="number" ng-model="p"> </br>
Enter Value for R<input type="number" ng-model="r"> </br>
Enter Value for T<input type="number" ng-model="t"> </br>
<span>
<h1> This is simple intrest</h1>
<p> {{p*r*t/100}} </p>
</span>
</div>
</body>
</html>
2. Expression when using Strings:
Syntax
<element> {{strings}}</element>Example
<html><head> <script src="angular.min.js"> </script></head>
<body>
<div>
<p>First Name:<input type="text" ng-model="f_name"></p></br>
<p>Last Name:<input type="text" ng-model="l_name"></p></br>
<select ng-model="course">
<option>BBA(CA)</option>
<option>BBA(CA)</option>
</select>
<p> Detail you enter:{{f_name + l_name+ course}}</p>
</div>
</body>
</html>
3. Expression when using Object:
Syntax:
<element> {{objecctname.variablename}}</element></xmp>Example
<html ng-app><head> <script src="angular.min.js"> </script></head>
<body>
<div ng-init="player"={name:'sachin',game:'cricket'}”></div>
<span>{{ player.name}}</span>
<span>{{ player.game }}</span>
</body>
</html>
4. Expression when using Array:
Syntax
<element> {{nameofarray[indexvalue]}}</element>Example:
<html ng-app=” “><head> <script src="angular.min.js"> </script></head>
<body>
<div ng-init="players"=['SACHIN','DHONI','ANDY FLOWER','JACK KALLIS']></div>
<h1>
MODEL1:{{players[0]}}<br>
MODEL1:{{players[1]}}<br>
MODEL1:{{players[2]}}<br>
</h1>
</body>
</html>
Data Binding
The Data Binding refers to the synchronization of data between the model and view. Synchronizing data is imperative(vital) for keeping the data being displayed to the user and the data being stored updated at all times. In AngularJS, Data Binding is an important concept as it acts as a bridge between the view and the logic of the AngularJS app.Data Binding In AngularJS is achieved by using Directives.
There are 2 major components of Data Binding in AngularJS:
- Model:It is responsible for maintaining data in the application.
- View:It is the HTML container where the app is displayed to the user.
- One-way data binding
- Two-way data binding
One Way Data Binding:
In one-way data binding, the flow of data is in one direction only i.e. from model to view. A value is taken from the data model, inserted in an HTML element, and displayed to the user. But there is no way to update the model according to the input given by the user which means that the data can't flow from the view to the model.
Example
<html><head> <script src="angular.min.js"></script> </head>
<body ng-app="myApp">
<div ng-controller="myCtrl">
<h1>{{title1}}</h1>
<h2>{{title2}}</h2>
<p>{{description}}</p>
</div>
<script type="text/javascript">
var app = angular.module("myApp", []);
app.controller("myCtrl", function ($scope) {
$scope.title1 = “One Way Data Binding ";
$scope.title2 = "AngularJs Data Binding";
$scope.description ="Data Binding refers to the synchronization of data between the model and view";
});
</script>
</body>
</html>
Two Way Data Binding:
In this type of data binding, the flow of data is bidirectional i.e the data can flow from the model to the view as well as from the view to the model. In simple words, we can say that when the data in the model changes, the changes are reflected in the view and when the data in the view changes the model is also updated. The view and model are updated at all times. Two-way data binding is achieved by using the ng-model directive. The ng-model directive transfers data from the controller to the view and vice versa.
Example
<html><script src="angular.min.js"></script>
<body>
<div ng-app="" ng-init="firstName='Ajeet'">
<p>Input something in the input box:</p>
<p>Name: <input type="text" ng-model="firstName"></p>
<p>You wrote: {{ firstName }}</p>
</div>
</body>
</html>
No comments:
Post a Comment